Preface
The Mobile Informer platform is a mobility environment built specifically to support mobile applications that integrate directly with Maximo. The platform enables rapid development of lightweight, extensible applications that allow for direct communication with Maximo via web services and comply with open standards.
Deployed within Maximo, the Mobile Informer server platform requires no middleware software. Mobile Informer manages the heavy-lifting and complexity of mobilizing Maximo, letting you design custom user interfaces specifically to support each business process, while taking advantage of the wide range of native features available in each mobile environment.
The Informer platform management is separated into two Maximo applications: Informer Developer, and Informer Administration. Informer Developer is provided for developers of Informer applications and advanced system administrators. It provides access to all aspects of both configuration and administration of Informer. The Informer Administration application is a limited version of Informer Developer and only contains the functions relevant to the administration of deployed applications.
This document covers the use of the "Informer Developer" Maximo Application.
Tabs
Profile List
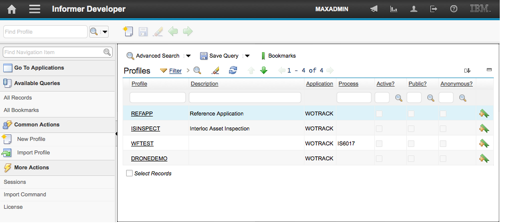
The List tab is used to search for available Informer profiles and provides access to both the Advanced Search and Where Clause search features.
The Sessions, Import Profile, Import Commands, and License Select Action menu items are available from this tab and can be used to view the current global active Informer user sessions as well as import a new Informer Profile and Command archives. The specifics of these actions will be covered later in this guide under their respective Select Action menu items.
Profile Tab
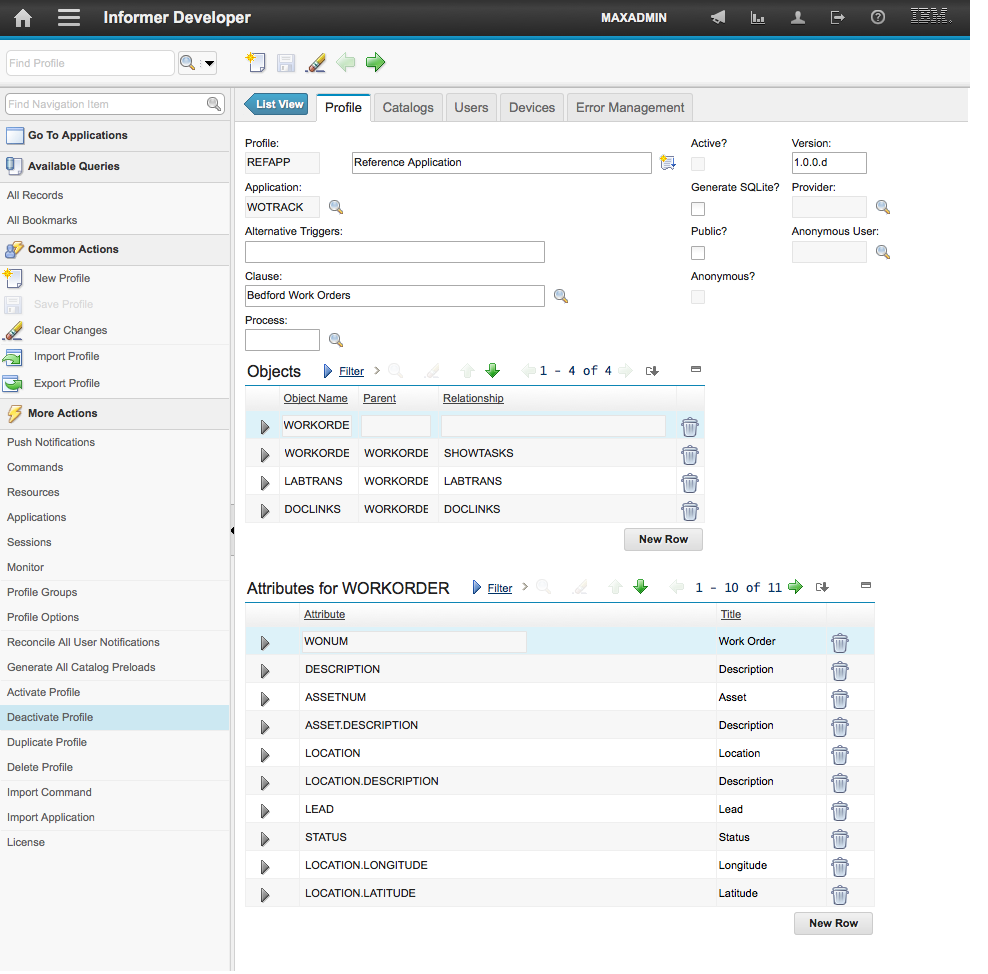
The Profile tab provides access the primary Informer profile configuration information.
From this tab, the user can configure the profile name, application to be exposed, where clause or workflow process used to filter data, and data structure to be provided to the mobile device in the form of Notifications.
The Active checkbox indicates if the profile is currently active and listening for events within Maximo. Profile activation will be covered later in this guide.
The GenerateSQLite checkbox indicates whether Preloads should produce SQLite data to download. Preloads will be covered later in this guide.
The Public and Anonymous checkboxes indicate whether the Profile’s defined Commands and Resources should be available to users without Maximo user accounts. Commands and Resources are covered later in this guide.
|
Note
|
In Informer 5.4, users can be either registered users, or public-anonymous users. Having a profile enabled for "Public" but not "Anonymous" is not currently supported |
The Associated Applications table displays other Maximo applications associated with this profile. It only affects which Users can be added to the profile.
The Objects table will default to contain the primary object of the selected application to expose. This object is required and cannot be removed from the profile. Child objects may be selected and related to the parent based on the relationships defined in the Database Configuration application for the selected parent and child objects.
The Attributes table allows specific attributes from the selected object to be included in the profile. Related attributes (such as LOCATION.DESCRIPTION or LABOR.DISPLAYNAME) can be used and updates will be listened for based on the related records selected.
Catalogs Tab
The Catalogs tab allows the user to define, modify, and manage catalogs. Catalogs are the reference data that is made available to the device and that is managed separately from the notifications that the profile may trigger.
Catalogs Table
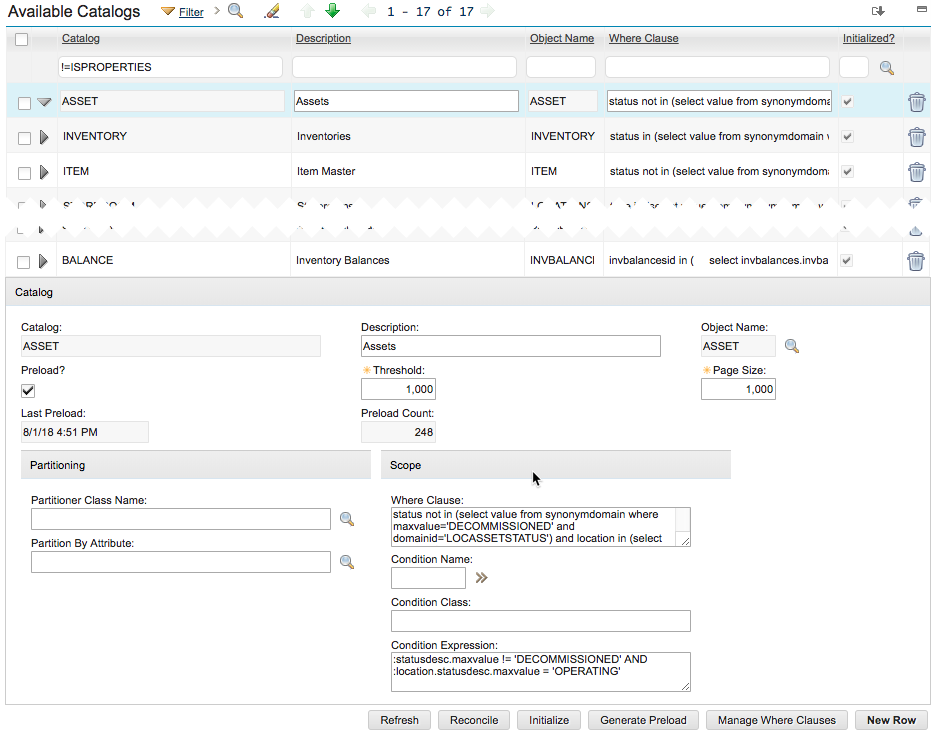
The Catalogs table displays all of the catalogs defined for the Profile. The "refresh" action button below the table will refresh the display of the table’s contents.
Primary Catalog Attributes
- Catalog
-
Unique arbitrary name for the Catalog. This is the name by which the server and devices will track Catalogs and reference them in communications.
- Description
-
Human-friendly description of the Catalog
- Object Name
-
MBO type the Catalog represents
- Where Clause
-
The selection clause for the catalog. This clause is run against the MBO type specified in "Object Name" to determine which MBOs are in scope of the Catalog.
Catalog Initialization
Once the Profile is active, Informer will observe changes to data it is tracking, and save those changes as deltas. Before this can happen, however, Informer needs to form a baseline set of Informer data for each Catalog to record these changes against as they occur.
Initialization is an extended process which runs is executed by background Queue Processors once initiated.

Initialization Attributes
- Initialized?
-
Indicates whether the Catalog has completed its initialization process. All Catalogs must indicate Initialization before a profile becomes active.
Initialization Action Buttons
- Initialize
-
Queue initialization of all selected Catalogs
Catalog Preloading
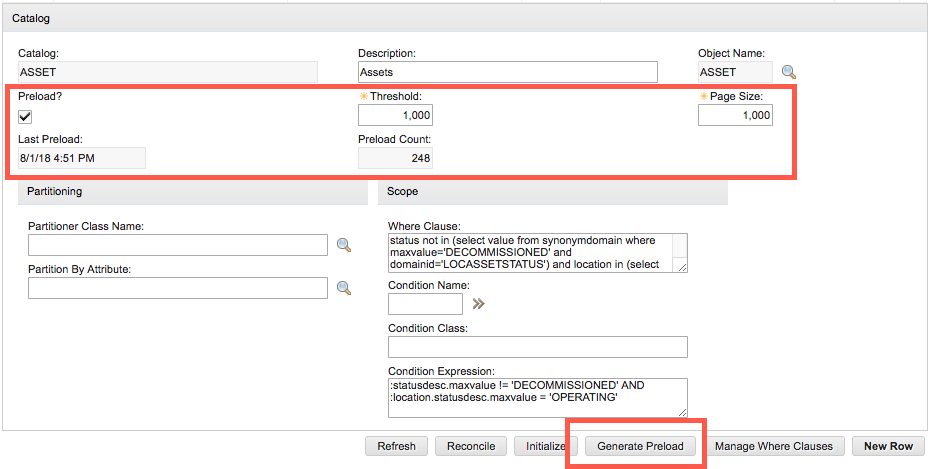
If the Catalog "preload" checkbox is marked, then the catalog pages that will be delivered to the device are pregenerated and statically available for when a device makes and initial catalog load request. For large catalogs such as assets and locations, this will significantly reduce the catalog delivery time for initial provisioning. It will also significantly reduce the server load since the catalog will not need to be generated for each device that makes the request, but rather only once for the pregeneration.
Activating "preload" is optional, but recommended in almost every circumstance.
Catalog Preload Attributes
- Preload?
-
Indicates whether the Catalog supports Preloads.
- Threshold
-
Since catalogs are dynamic and change over time, from time to time the preloaded catalog will need to be refreshed. The value in the Threshold field determines how many catalog updates can occur before a catalog is considered stale and is regenerated by a configured system crontask.
- Page Size
-
When performing a preload, this is the number of catalog records stored in each communication payload. Normally this is driven by the Informer application, but when specified on the server, the pregenerated pages are fixed size and will be delivered in the size configured.
- Last Preload
-
Timestamp when the last preload operation produced preload pages.
- Preload Count
-
Number of records currently stored in preload pages
Preload Action Buttons
- Generate Preload
-
Queue the (re)generation of preload data for the selected Catalog(s), as necessary according to the attributes set.
Catalog Reconciliation
Catalog data is collected two primary ways: Initialization, and events listeners for MBO changes when the profile is active.This leaves out three cases:
-
Changes which occurred while the Profile was inactive
-
Changes made while the server is in Admin Mode
-
Changes made with direct SQL statements, bypassing the MBO layer, such as following a data migration or manual integration
In any of these cases, we may have changes which Informer did not observe when they occurred, possibly resulting in outdated Catalog information.Informer can reconcile its catalog records when asked to, to pick off these changes.
Changes, while the Profile was inactive, are always possible, so a reconciliation task is an automatic part of profile activation.In other cases, however, reconciliation should be triggered manually when an administrator anticipates or observes untracked changes.
Reconciliation is an extended process which runs is executed by background Queue Processors once initiated.
Reconciliation Action Buttons
- Reconcile
-
Open a dialog box to create your reconciliation request.
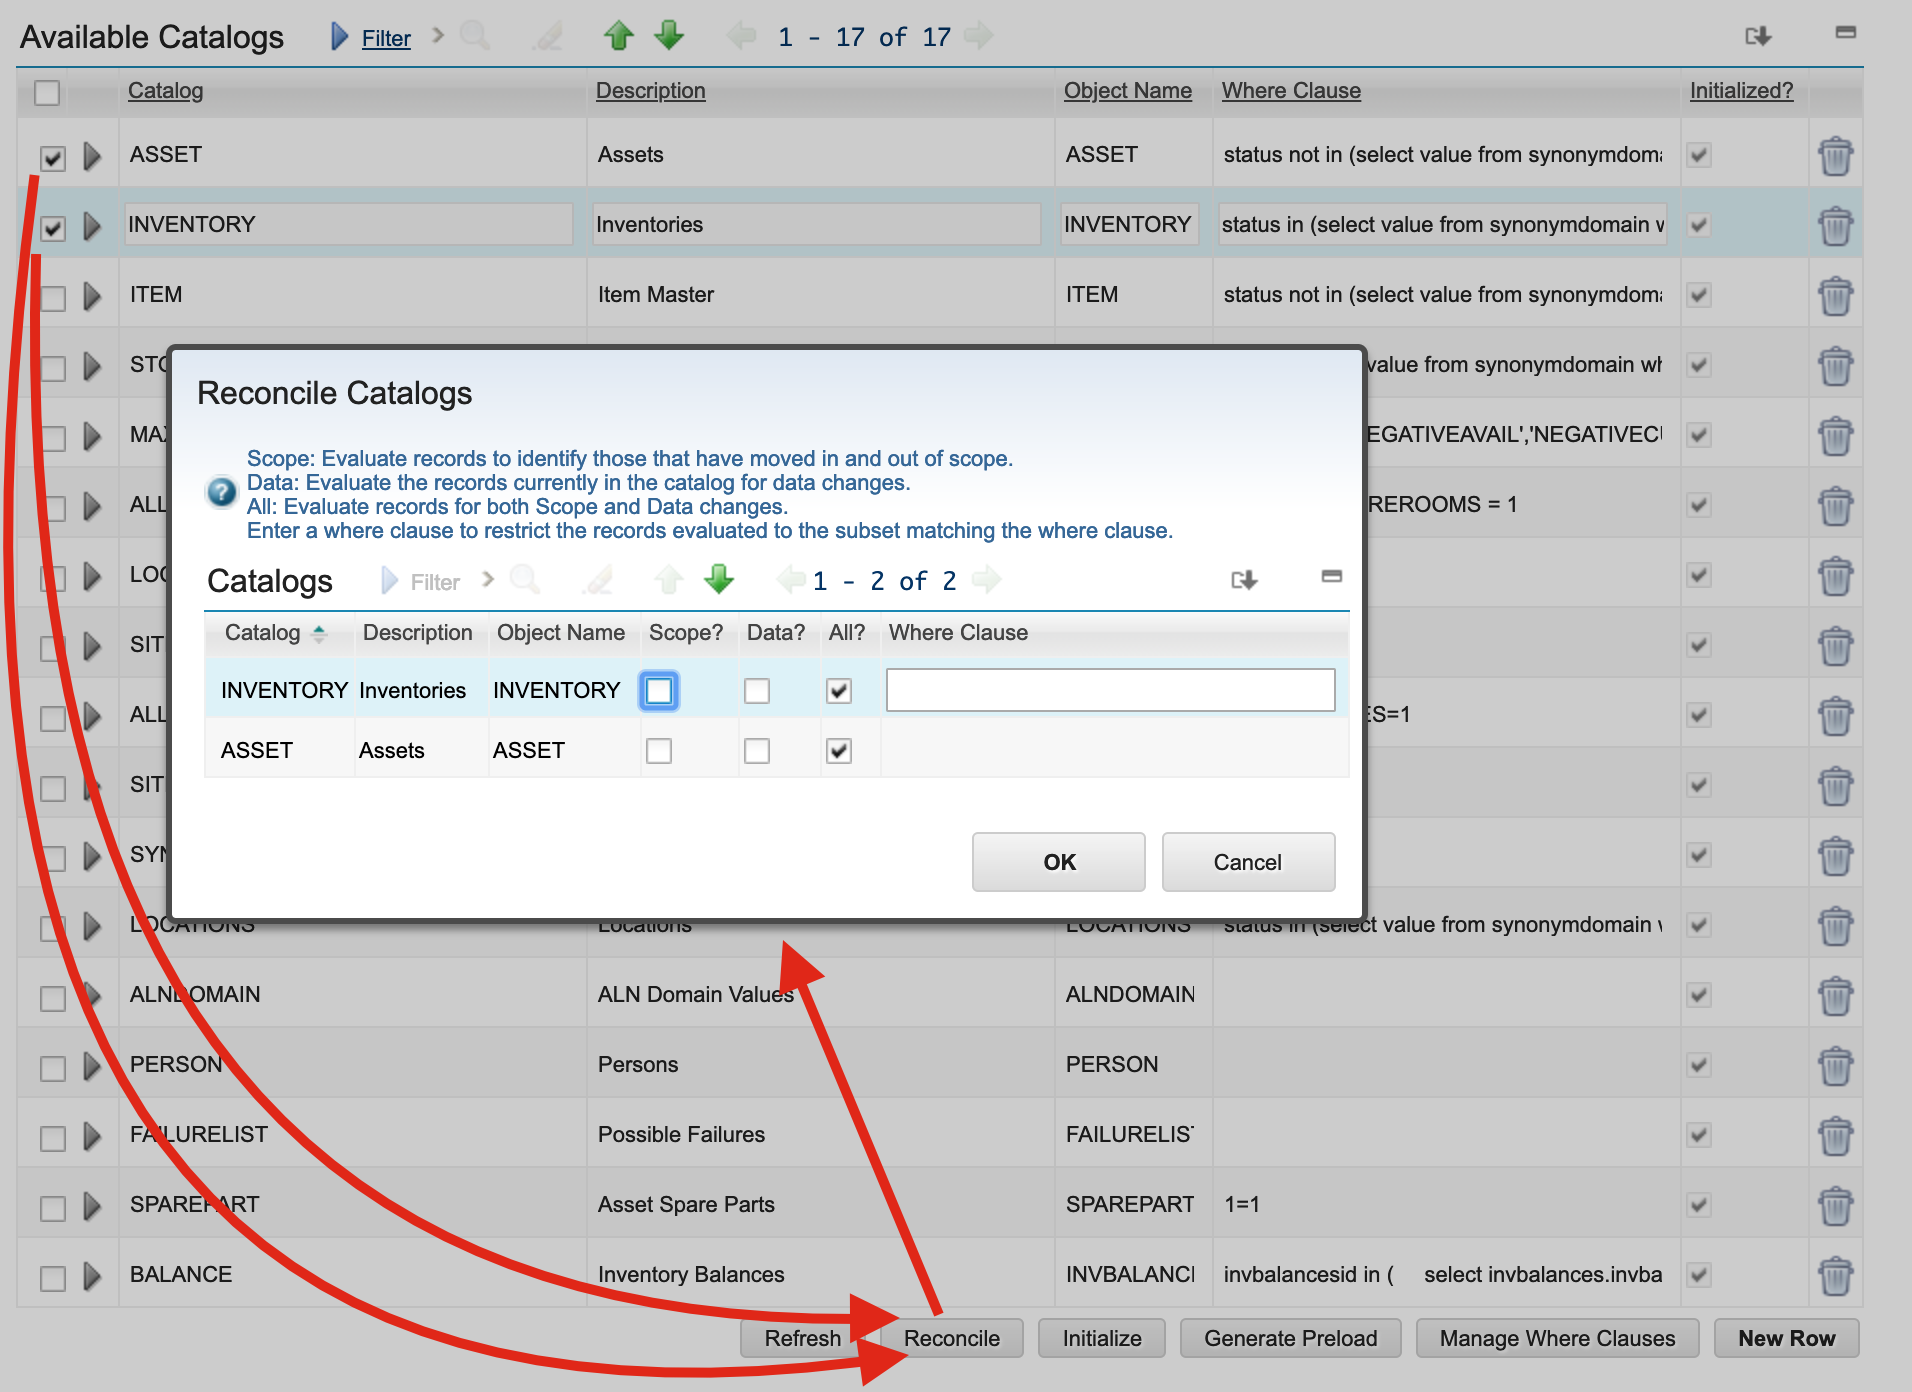
Reconciliation Attributes
- Scope
-
Evaluate records to identify those that have moved in and out of scope.
- Data
-
Evaluate the records currently in the catalog for data changes.
- All
-
Evaluate records for both Scope and Data changes.
- Where Clause
-
Restrict the records evaluated to the subset matching the where clause.
Choose Scope, Data, or All (means both Scope and Data) or optionally enter a where clause for restricting your reconciliation and press OK button. For each selected Catalogs, Informer will fetch all matching records according to selected attributes, and build the baseline set of Informer data for the Catalog. This is an extended process which runs is executed by background queue processors once initiated.
Catalog Partitioning
The simplest and (presumably) most common example is partitioning a Catalog based on SITEID (where applicable). In some cases it may be desirable to only synchronize a subset of a larger Catalog, based the user, the device, or any other runtime criteria. To allow only part of the Catalog to be synchronized, a mutually-exclusive partitioning scheme can be defined.
A "Partition by Attribute" field appears on both the main Catalog record, and in its "Manage Where Clause" dialog. Specifying an attribute will allow synchronization of that Catalog limited to those where the specified attribute has a specific value. Secondary attributes (e.g. ASSET.STATUS) and N-ary attributes (ASSET.LOCATION.STATUS) are acceptable.
When the desired partitioning scheme cannot be directly represented by an attribute, a custom implementation of com.interlocsolutions.maximo.notify.queue.catalog.CatalogPartitioner can be specified instead.
Such implementations can be included in Command JARs, and imported in the same way.
In this way they can be defined or updated in a live system.
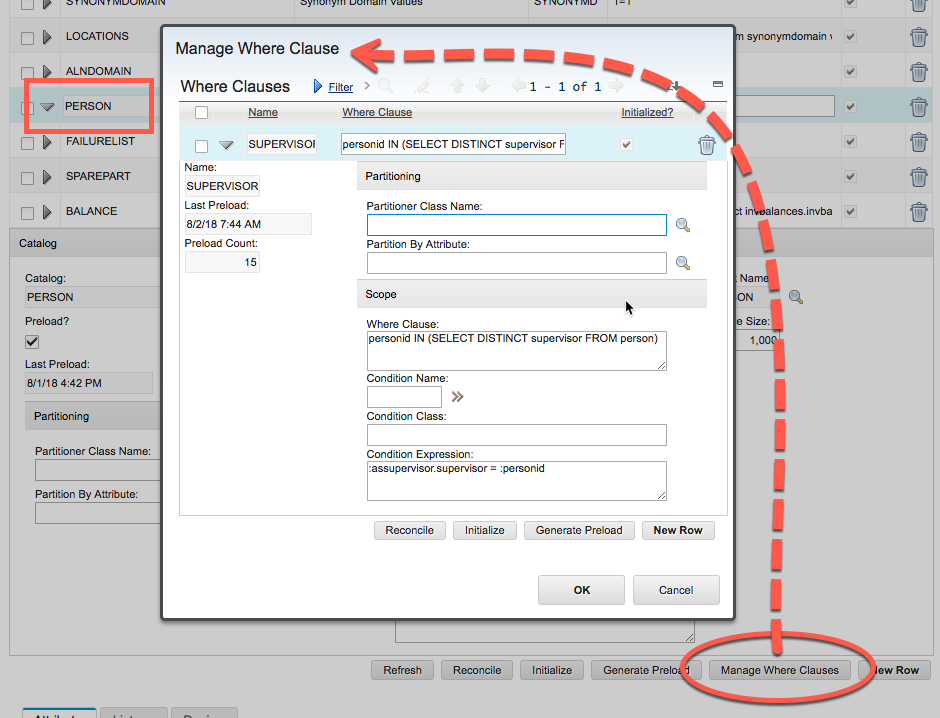
Manage Where Clauses
In some cases it may be desirable to have multiple variations on a single base catalog definition. In these cases additional where clauses can be added by clicking the Add Where Clause button. Each additional where clause will be named and the unique where clause will be specified. In the example below the catalog is broken into two sites, SITE1 and SITE2 and the application can then choose to only download the relevant site information by specifying the Where Clause Name + "_" Catalog Name.
Sub-Tabs
Attributes Sub-Tab
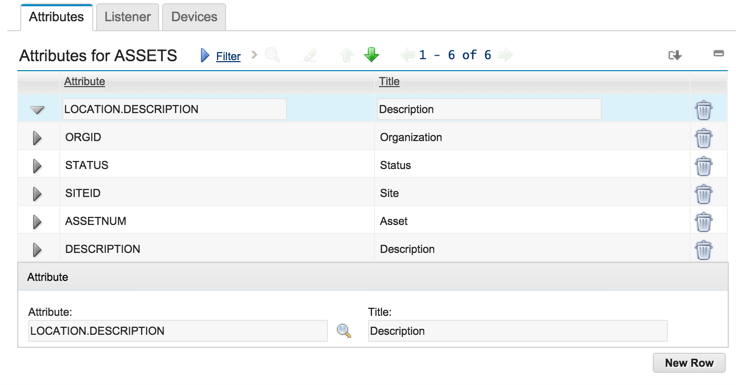
The Attributes table allows specific attributes from the Catalog’s MBO to be selected.
These attributes marked with "In Catalog" will be included when a request for the catalog is made. Only changes to the listed attributes marked as "In Filter" will trigger updates being sent to the devices. Similar to Notifications, attributes on Catalogs can be either primary attributes on the Catalog’s backing MBO, or can be relationship-derived, such as PERSON.DISPLAYNAME for a LABOR object.
To use this functionality, the informer.eventfilter Maximo property must be set to com.interlocsolutions.maximo.notify.filter.AttributeFilterFactory. When doing so, review the Catalog Where Clause, and Conditions for database columns that will trigger data changes. If those database columns are not part of the existing list of attributes, add them with "In Catalog" unchecked and "In Filter" checked.
Listener Sub-Tab
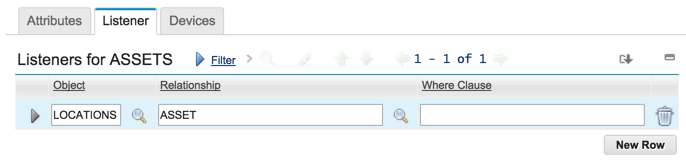
The Listener table allows secondary MBO listeners to be specified for the selected Catalog. In this example, the ASSETS Catalog has a LOCATION.DESCRIPTION attribute. An update of the Location’s DESCRIPTION does not trigger a modification on the ASSET MBO, but it does update our ASSETS Catalog, so we need a secondary listener to catch this case. Here, this list entry specifies that if a LOCATIONS object is updated, Informer may need to update any records it has on the ASSETs identified via its LOCATIONS.ASSET relationship.
The Where Clause is an alternative to the specification of a defined Maximo relationship, but otherwise works the same.
Devices Sub-Tab
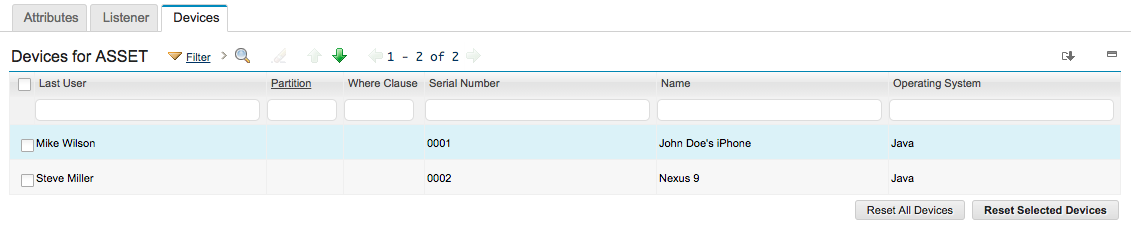
The Devices sub tab displays a list of devices which have a copy of the selected Catalog.
Some registrations are against an alternative where clause, in which case there is a value in the "Where Clause" column. Some registrations are limited to a specified partition name, in which case there is a value in the "Partition" column. If a value appears in both fields, the device has synchronized a partition of the specified alternative where clause. It is possible and acceptable for the device to appear multiple times, spread across different partitions and/or where clauses.
To force a reset of the data on one on more devices, select the devices to reset and then click the Reset Selected Devices button.
Users Tab
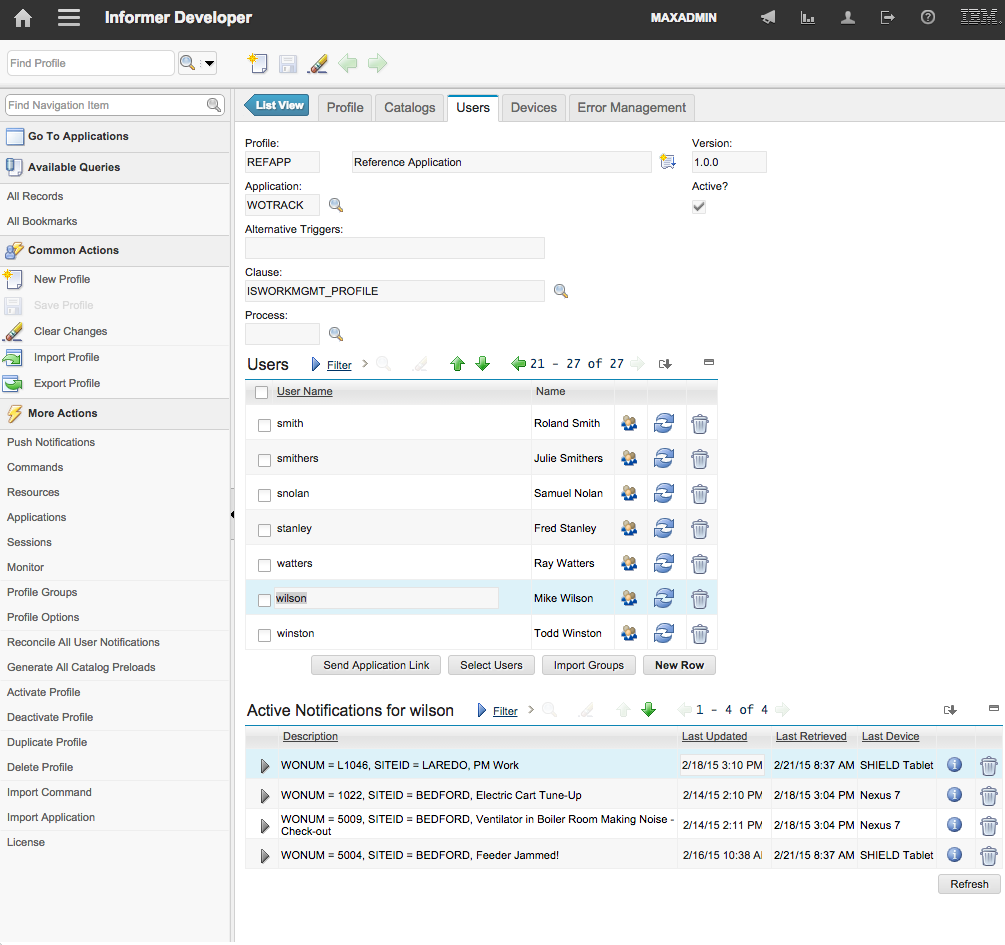
The Users tab allows specific users to be granted access to the selected profile. It also allows the user’s active notifications to be viewed and removed if desired.
Users Table
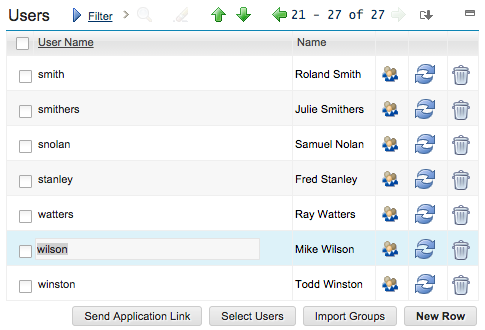
Clicking the "sessions" icon button (third from the right) will display the selected user’s session history.
Clicking the "refresh" icon button (second from the right) will cause the system to reevaluate all current notifications for that user.All notifications will be first deactivated; all notifications will then be reevaluated to find any new notifications.
Clicking the "trashcan" icon button will delete the user and all their active notifications.This will prevent the user from performing any further actions and will further prevent them from logging into any application that utilizes the profile.
Clicking the "Send Application Link" button will send an email to the selected users, assuming an email address is available, containing a link for the application download.
A communication template named INFORMER is created on install and is used by default for the email template.
This template can be modified to contain additional instructions as necessary, or can be replaced with a different template by setting the informer.deploy.commtemplate Maximo system property.
Clicking the "Select Users" button allows multiple users to be selected and added to the profile in a single action.
Clicking the "Import Groups" button provides access to select a Maximo security group from which all the users of that group will be imported into the profile if the user is not already associated with the profile. This is a one time import and will not keep the Informer profile users in sync with the Maximo security group users.When a group is imported a corresponding option group, which is discussed in the Select Action menu options section, is created and all users from the security group are added to the option group by default.
Active Notifications Sub-Table
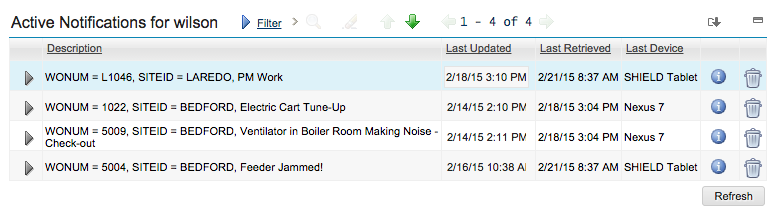
The Active Notification Table displays the list of Notifications currently active for the highlighted user in the Users table above.
The "Last Updated" column indicates the time the Notification was added or was last modified.
The "Last Retrieved" column indicates the last time a device fetched this Notification for the user.
The "Last Device" column indicates which device most recently fetched this Notification for the user.
Active notifications can be removed simply by deleting the notification record to be deactivated.A new version of the deleted notification may still be created if Informer re-evaluates this record and it still satisfies the where clause specified.
Retrieval History
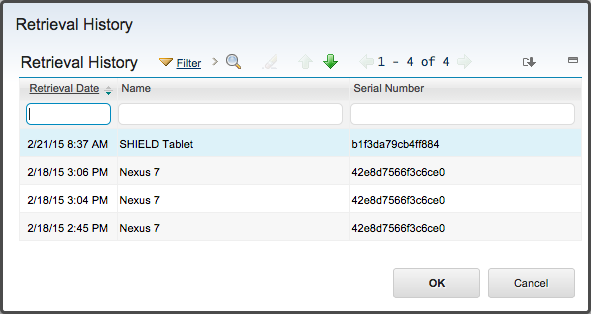
Clicking the "info" icon button on a row (second from right) will display the known retrieval history for Notification, if this feature is enabled.
Devices Tab
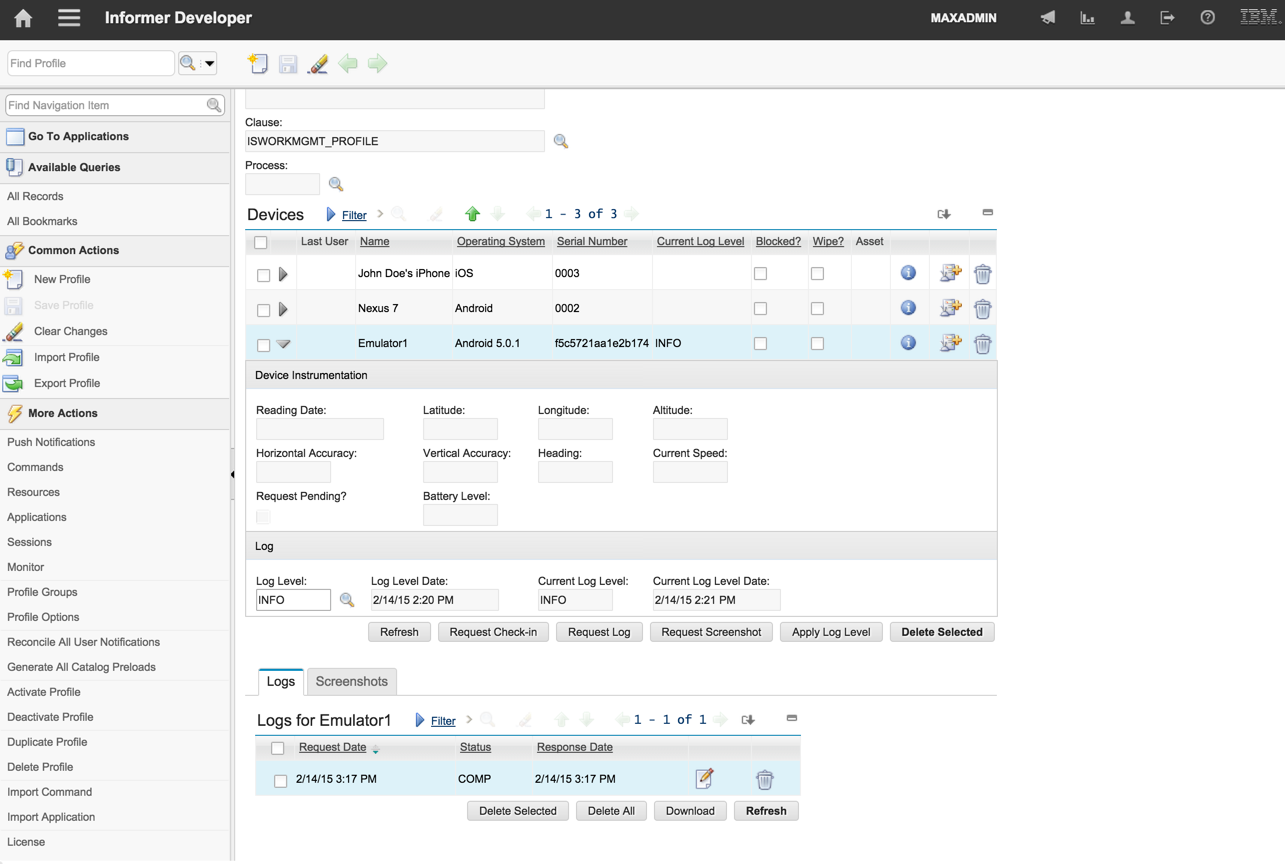
The Devices tab allows an administrator to manage the devices that are being used on the selected profile. While Informer is not designed to be a full device management platform, basic management functionality is provided to block and wipe application data, in addition to viewing application logs and screenshots.
On the Android platform it is possible to implement full device management capabilities such as the ability to remotely lock and factory reset the device. This capability must be implemented and enforced by the application through the Informer client library.
Blocking and Wiping Devices
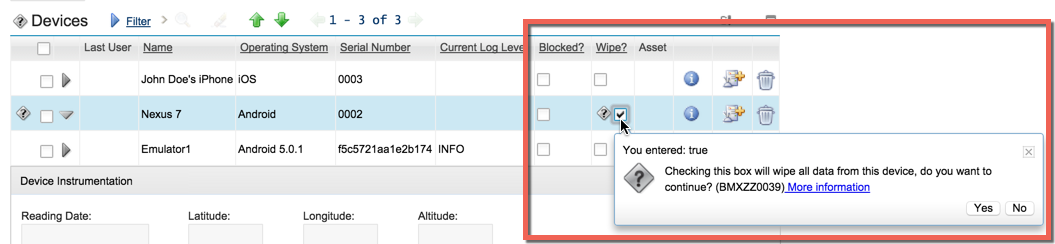
To block a device check the Blocked check box for the desired device and click the OK button to accept.A push message will be sent to the device to log out the current user and prevent further log in attempts.If push support has not been implemented, the next time the device attempts to connect to the server, the server will respond with a BLOCKED message and the application will be denied access to authenticate any user on that device.
The wipe feature is the more extreme form of block, in that in addition to not authenticating any user originating from the device any application data on the device will be removed at the next attempted login. To wipe a device check the Wipe check box for the desired device and click the OK button to accept.
On the Android platform, if device management has been enabled, marking a device for wipe will perform a factory reset.
Deleting a Device
If a device is deleted a full reset of the device data will be requested. Depending on the application design, this may happen in the background or the user may be prompted to re-authenticate and the initial load screen displayed while the application is reloaded. Once the reload is complete the device will be recreated and matched back with previous data based on the device serial number, name, and last user id.
Creating an Asset Record for a Device
To further integrate the management of the mobile devices with Maximo, Informer provides the capability to create an asset record for each device.
To create a new asset record for a device click the  button for the desired device.
A dialog will ask for confirmation before creating the asset for the device.
button for the desired device.
A dialog will ask for confirmation before creating the asset for the device.
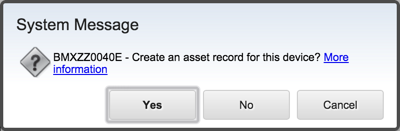
A dialog will then be displayed requesting the required information to create the asset record. At a minimum a Location and Site must be provided. Optionally an Asset record number can be entered, if left blank an auto-generated asset number will be used. The Item field can be used to specify a rotating item number to associate with the asset record. Clicking the OK button will complete the asset creation process.
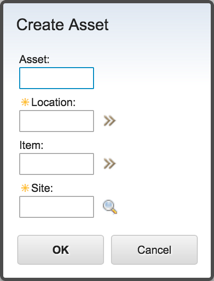
When the asset is created the most current user is set as the asset record’s owner and subsequent changes in user will change the custodian record for the asset.
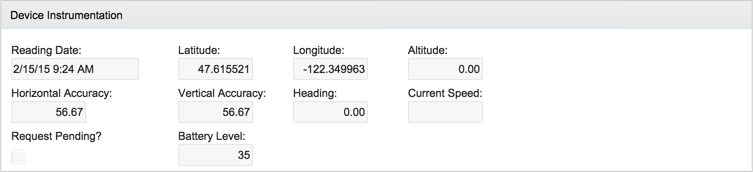
Requesting Instrumentation Data
Modern devices contain sensors that can tell position, heading, elevation, speed, along with numerous other data points. To make the most of that information the Informer comes with the ability to request this information built into the platform.
Clicking the Detail button for a selected device will display more information about the last instrumentation data provided by the device. The application developer can design the application to return instrumentation information at specified intervals or events, which can provide near real time updates to Maximo about the location of available workers. Alternatively, the system administrator can click the Request Check-in button and the device will receive a push notification requesting the latest instrumentation data available. This data will be sent back to the server as soon as it has connectivity.
Instrumentation data can be archived by setting the Maximo system property informer.keepinstrumenthistory to the value of 1 or true.
Due to potential privacy concerns the application developer can opt to ignore all requests for instrumentation data and instruct the client to block all attempts to send such data.
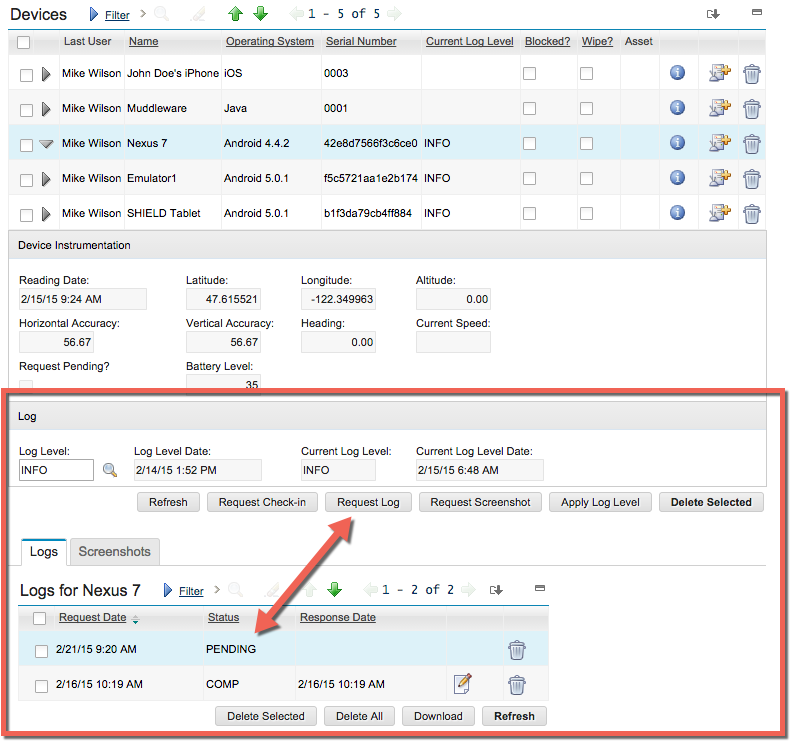
Managing Device Logging
The administrator may set a particular device’s log level and then request the logs from that device. This can be very useful when troubleshooting a remote user issue where physical access to the device may not be possible. Each device record displays the current log level and the date the log level was confirmed by the device. An administrator can enter a new log level in the Log Level field and once saved, a push message will be sent to the device to update the log level. Once the log level has been set on the device, the device will confirm the new log level by setting the Current Log Level field.
Clicking the Refresh button will update the visible device records so that after a request has been submitted an administrator can watch for the updated value without needing to reload the whole profile record.
Once the log level has been set the current device log can be retrieved by clicking the Request Log button.
This will create a new PENDING status log request entry in the Logs table under the Logs sub-tab and a push request will be sent to the device to return its current log set.
If push notifications are not supported, the requests will be issued during the next polling cycle, instead.
Once the device returns the current log the status will be changed to COMP and a log icon ![]() will be displayed.
Clicking on the log icon will open the log in a Maximo dialog.
Clicking the Refresh button on the Logs table will update the log table status without requiring the whole profile record to be refreshed.
This is useful to monitor for a new log entry when an immediate device response is expected.
will be displayed.
Clicking on the log icon will open the log in a Maximo dialog.
Clicking the Refresh button on the Logs table will update the log table status without requiring the whole profile record to be refreshed.
This is useful to monitor for a new log entry when an immediate device response is expected.
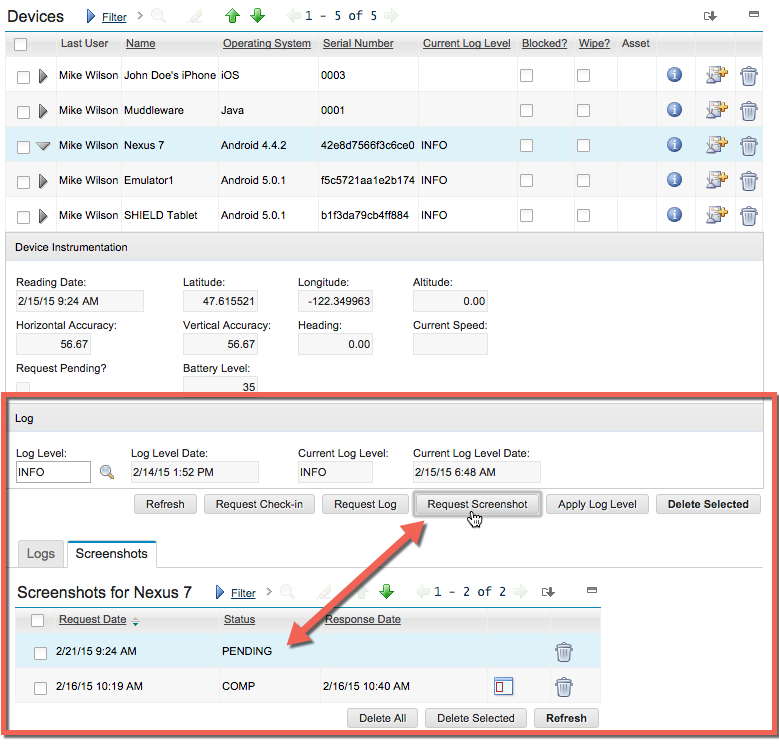
Managing Device Screenshots
When remotely troubleshooting a user issue it is often useful for the administrator to see what the user is seeing. For this reason Informer allows the administrator to request a screenshot from the application. To request a screenshot, select the device and click the Request Screenshot button. A new record will be created with a PENDING status in the Screenshot table, under the Screenshots sub-tab and a push request will be sent to the device requesting a screenshot. If push notifications are not supported, the requests will be issued during the next polling cycle, instead.
When the device receives the request, if the application is active a screenshot will be taken and returned immediately to the server. If the application is not active, the request will be queued until such time as the application is active, at which point the screenshot will be returned.
Once the screenshot request has been fulfilled the request status will change to COMP and the screenshot icon ![]() will be displayed.
Clicking on the screenshot icon will open the screenshot in a separate browser window.
will be displayed.
Clicking on the screenshot icon will open the screenshot in a separate browser window.
Error Management Tab
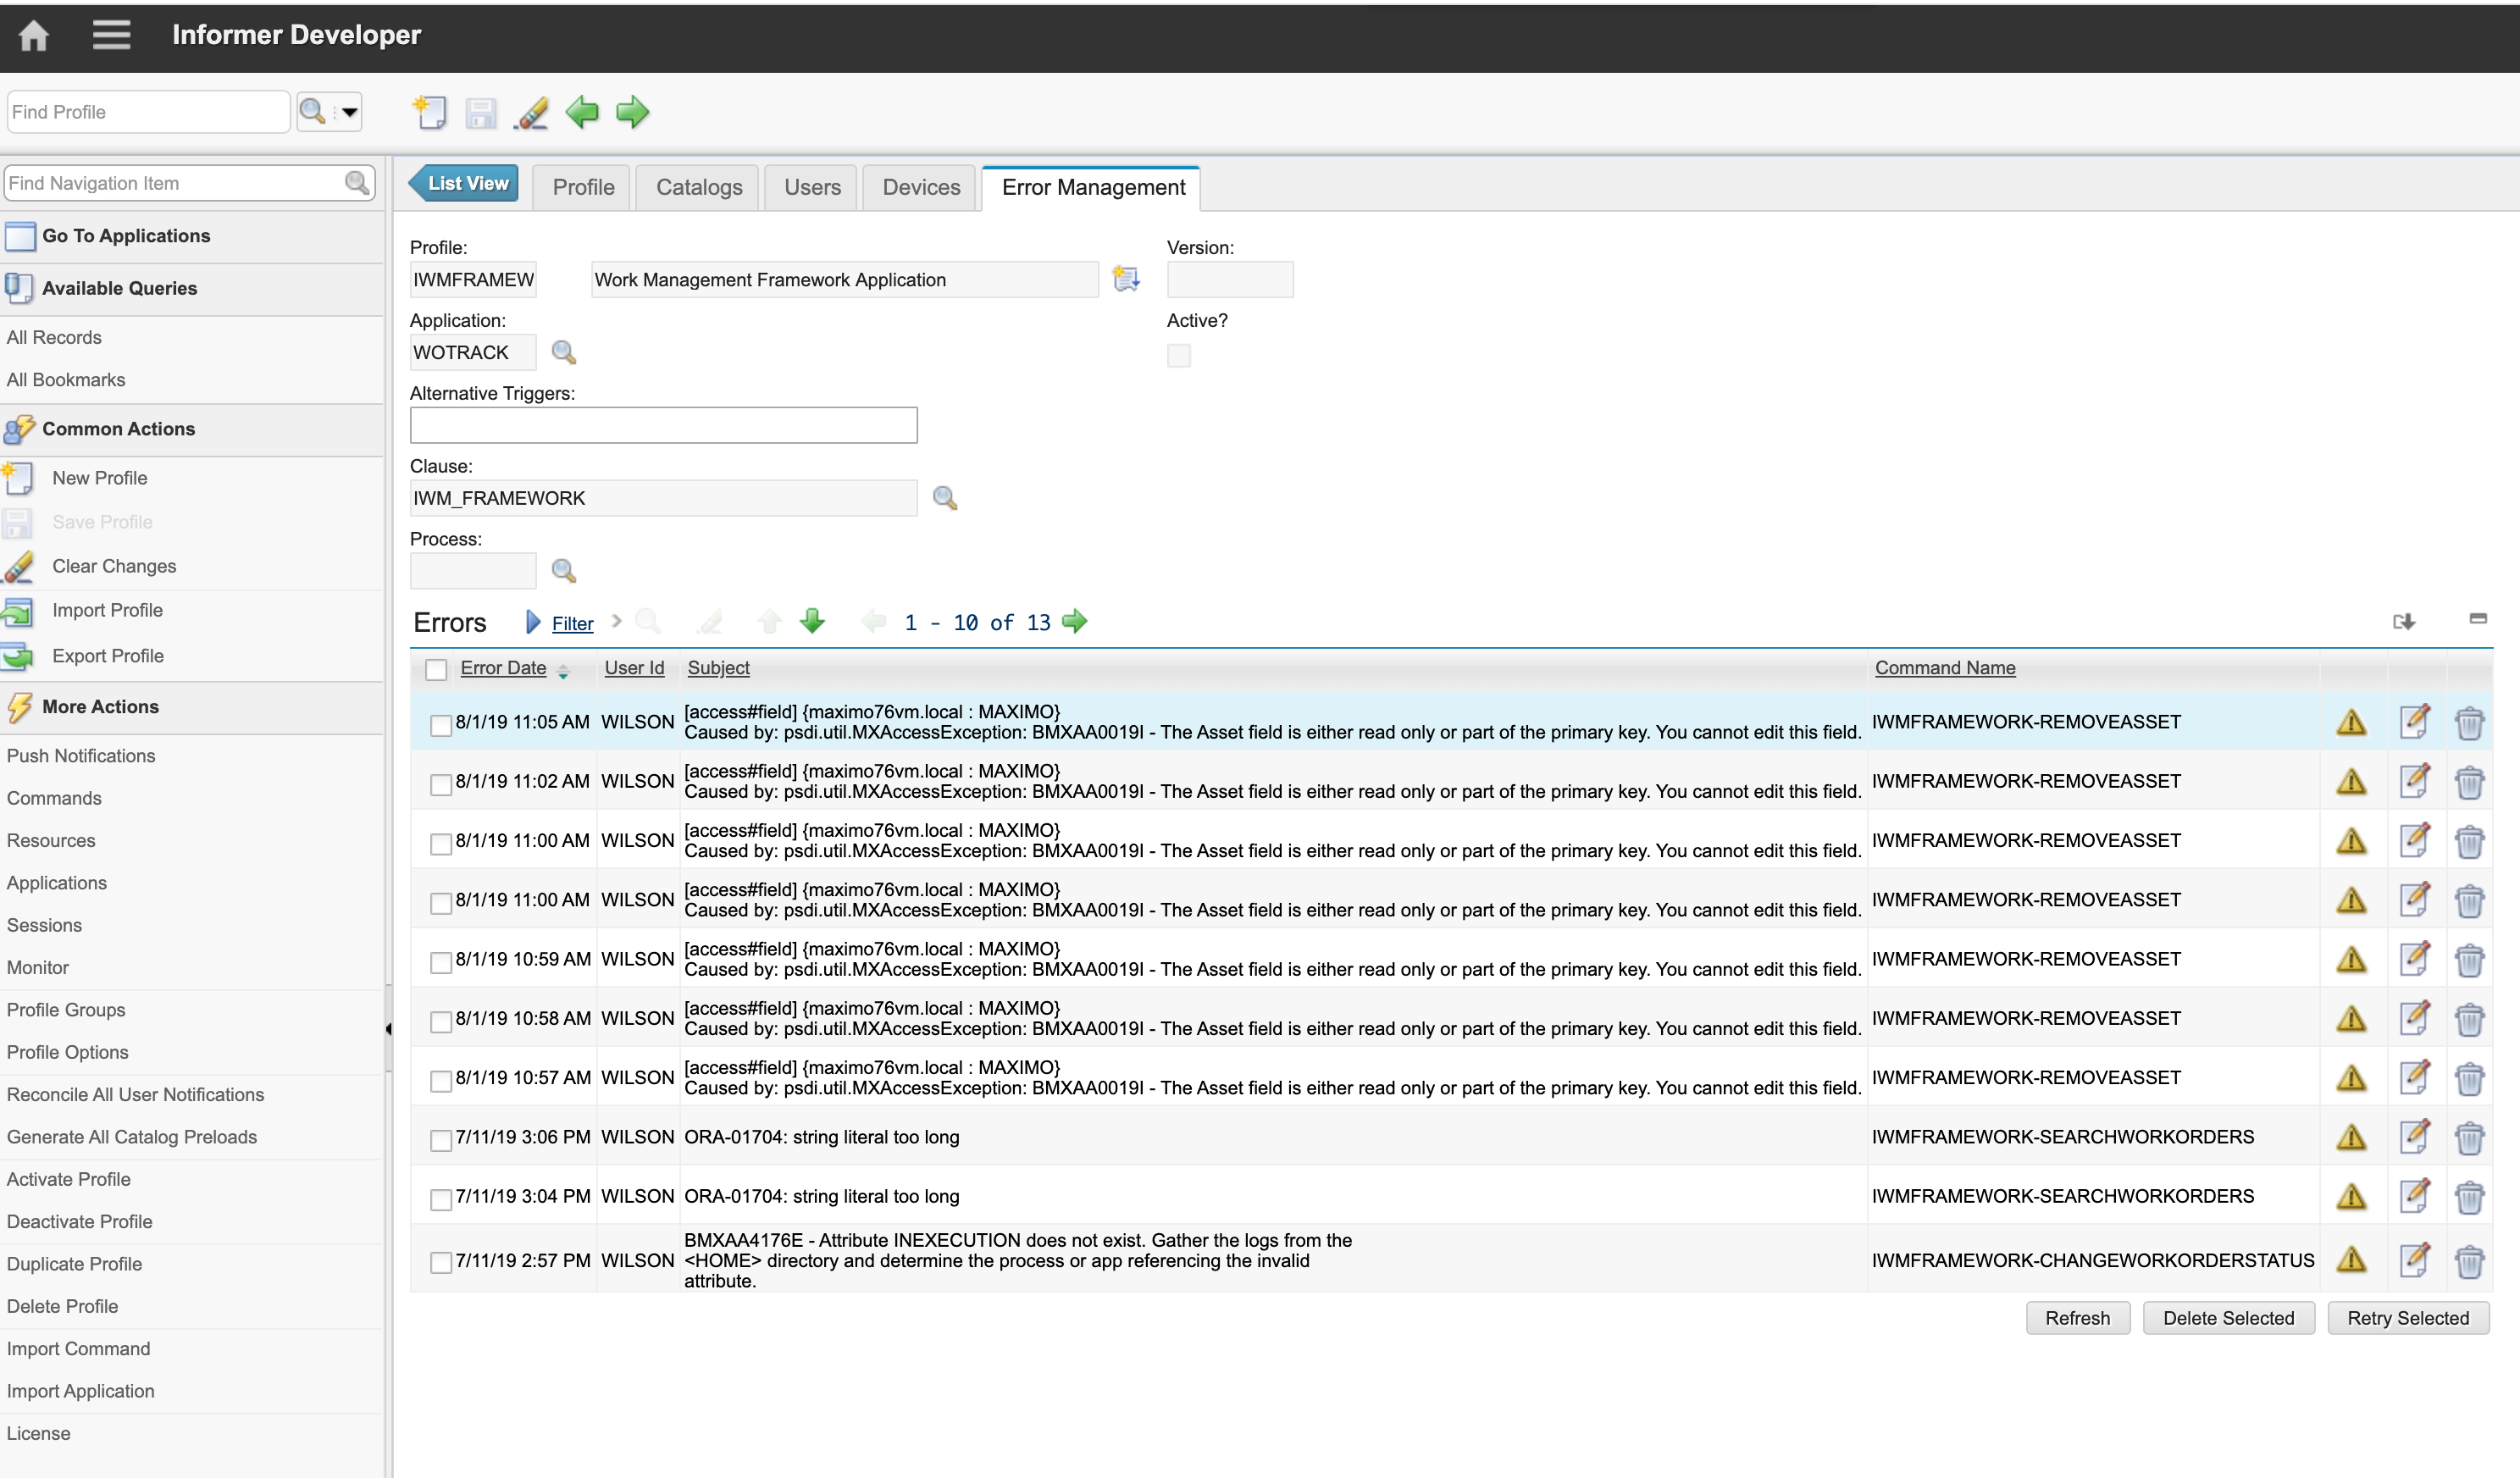
The Error Management tab allows the user to view and perform remedial action on any errors associated with the profile. This typically will occur when a command is sent from a device either in an improper format or if the command is unable to resolve a data or system conflict. While application error handling is dependent on the specific application, the Informer platform does return complete error details to the client and the application should properly handle notifying the end user of such errors.
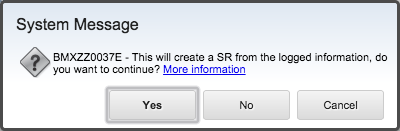
Service Requests (SRs)
Clicking the ![]() button will prompt the user to create a Service Request and if an asset has been associated with the device that the error was generated from, the asset and owner details will be included in the Service Request.
This allows errors from the device to be tied into the standard Maximo service desk processes and enables the proactive response to device errors.
button will prompt the user to create a Service Request and if an asset has been associated with the device that the error was generated from, the asset and owner details will be included in the Service Request.
This allows errors from the device to be tied into the standard Maximo service desk processes and enables the proactive response to device errors.
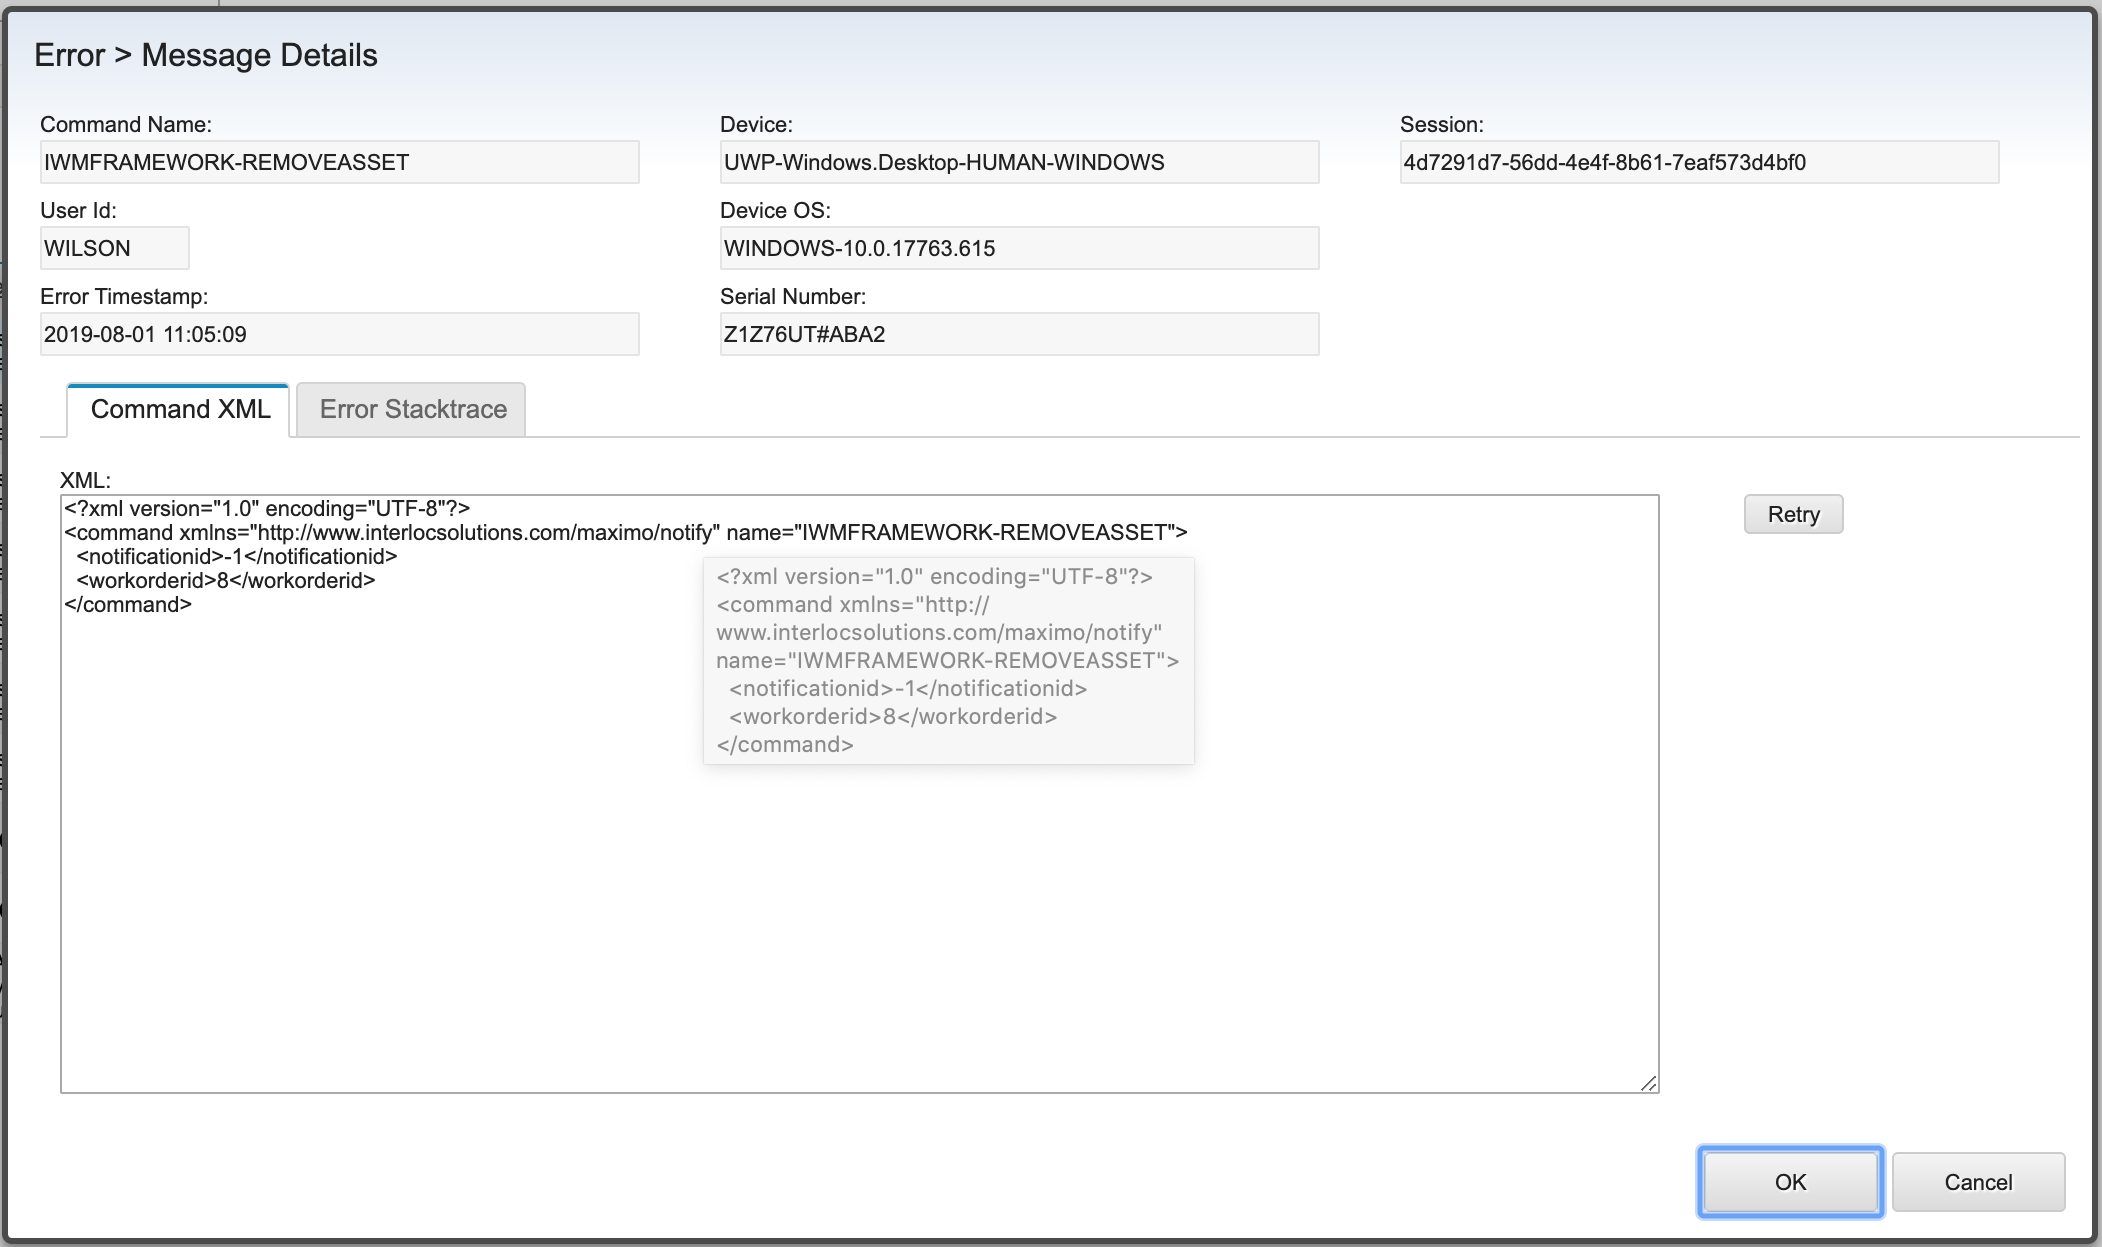
Error Details
Clicking the ![]() button will display the complete details of the error, including the command that was executed, the user, timestamp, device, and session identifier.
button will display the complete details of the error, including the command that was executed, the user, timestamp, device, and session identifier.
Command XML
The Command XML tab displays the XML that was sent from the device. The system administrator can edit this XML and retry it for processing with the modified values by clicking the Retry button. Retrying the command will cause the server to re-execute the command as the user that originally attempted the command and if successful notify the device of the error resolution. This will cause the device to retry the command which originally failed, at which point the server will return the result from the retried command, if any. This then completes the command transaction and allows errors to be resolved on the server and that resolution to be propagated to the device.
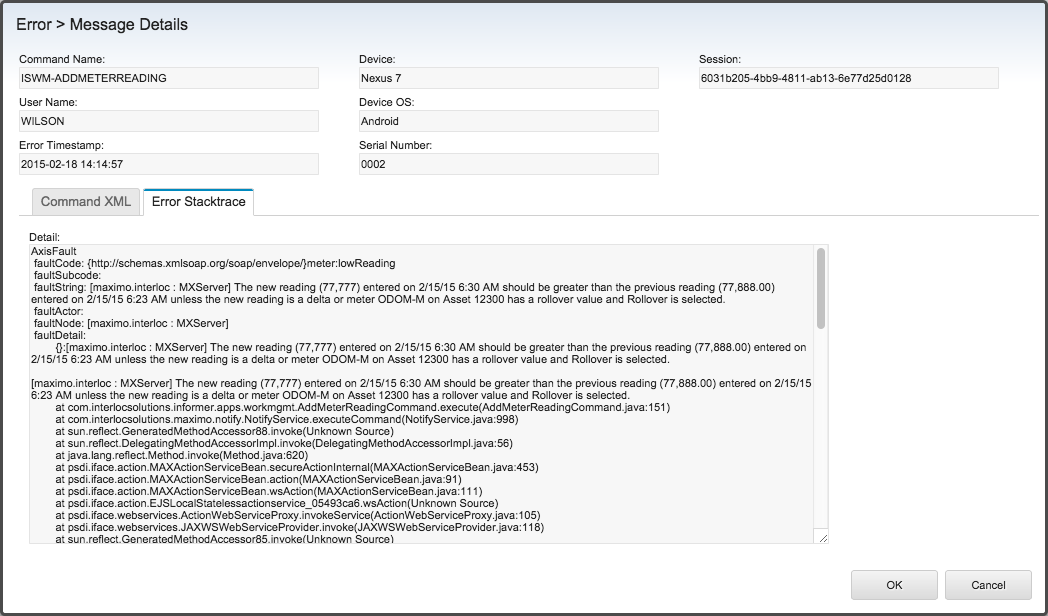
Error Stacktrace
The Error Stacktrace tab displays the full error stacktrace, extracted from Maximo system log. This allows an administrator to view the error log without requiring access to the Maximo server and without needing to manually search thousands of lines of log entries.
Select Action Menu Items
Push Notifications
Know Issues:
Issue 6150: Update message parameters not used
The Push Notifications action displays a dialog allowing the user to configure push notifications for the iOS Apple Push Notification Service(APNS) and Android Firebase Cloud Messaging (FCM) push notification frameworks.
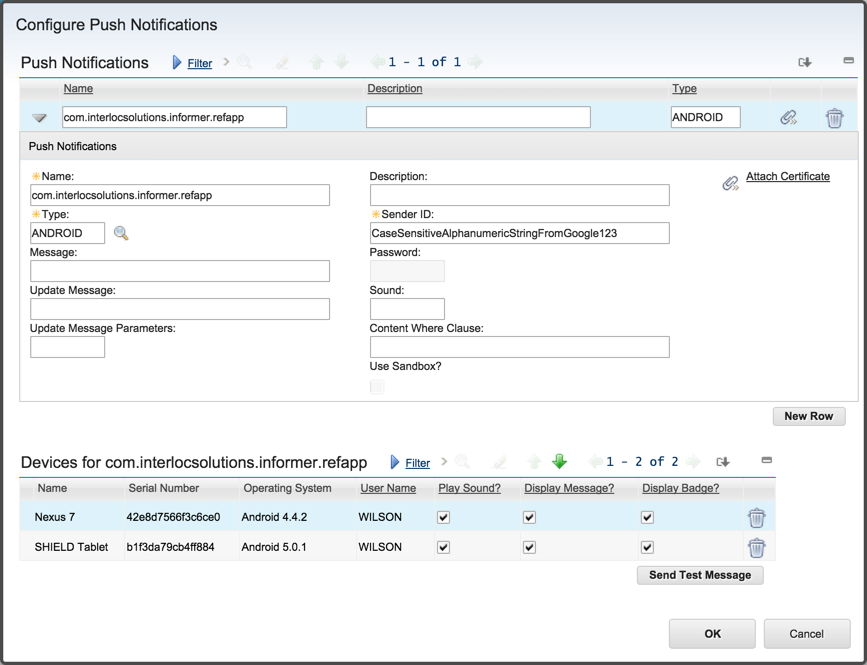
The Name field contains the name of the application, as registered with the respective service. The Type indicates whether it is Android (FCM) or iOS (APNS). The message field contains a generic message that will be delivered when one or more updates occur to existing user notifications. The Update Message field is the message to push, which can contain numerical parameters such as {0}, {1}, {2}, that will be replaced by the parameters provided in index order. The Update Message Parameters field contains a comma separated list of attributes that will be substituted into the message. The Description is an arbitrary description for the push notification. The Attach Certificate is used by iOS. The password is the password required only for iOS for decrypting the Attached Certificate. The Sound is the name of the sound file to be played on the device when the message arrives. The Content Where Clause is an arbitrary where clause that can be evaluated against the newly-changed data to check for a match, which will be indicated to the device via the push message to trigger content-conditional behavior. Finally, the Use Sandbox indicates if the push registration should use the Sandbox services.
As devices subscribe to the profile, if they opt to receive push notifications the device will be listed in the Devices table. Once a device has registered, specific features such as sound, message, and application icon badging can be turned on or off on a per device basis.
The Send Test Message allows a test push message to be sent to a selected device. This is useful when trying to troubleshoot connectivity or device refresh issues.
Commands
Commands are discrete actions that the application profile may perform within the Maximo system. Each command is a custom Java class that implements the Command interface and is typically developed by an application developer.Commands are then associated with a profile, which then allows an application to perform the actions available within the command. Commands can either be included in the Maximo class path at start up, in which case they will be automatically discovered and made available, or they may be uploaded (covered later in this guide)and registered manually. This dialog provides access to see which commands are associated with the profile. Basic information about the command such as its name, implementing class, and version number are provided.Commands can be invoked by any Informer user, and specific Commands can be made available to anonymous users as well, by checking both the Public and Anonymous checkboxes. Clicking the detail button for a command provides a generated sample XML representation of the command.
|
Note
|
Starting with Informer 5.4, users can be either registered users, or anonymous public users. Having a profile enabled for "Public" but not"Anonymous" is not currently supported. |
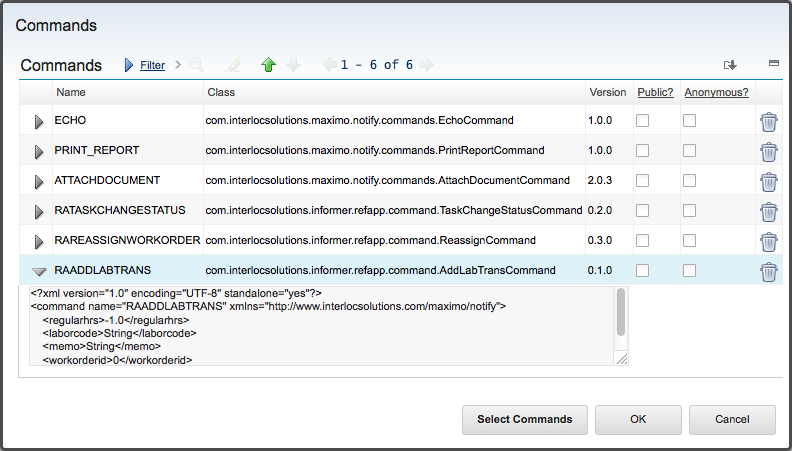
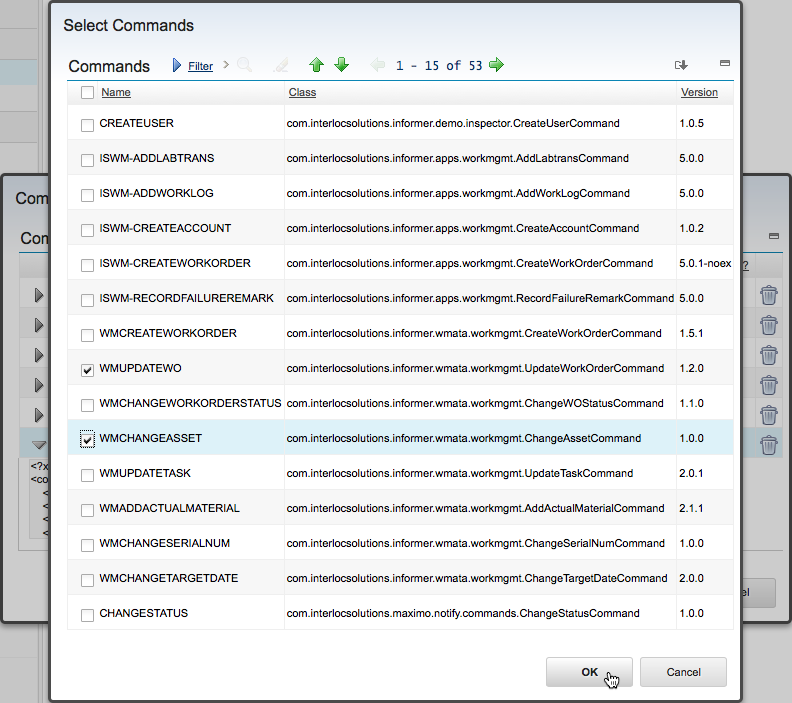
To add a new command to the profile, click the Select Commands button.The list of available commands will be displayed.Check the commands to associated with the profile and then click the OK button to accept the selection.
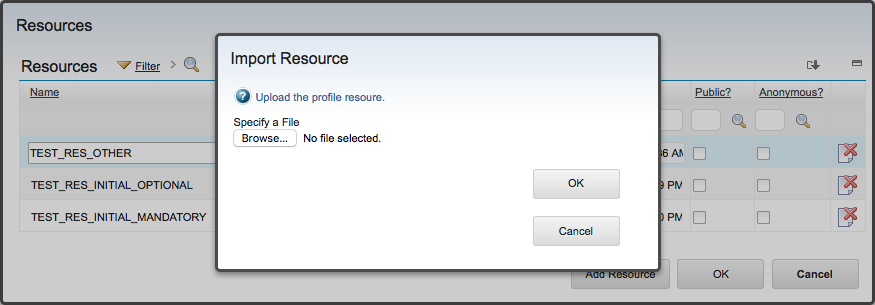
Resources
Resources are arbitrary files made available to Informer devices for download. Unlike Maximo DocLinks, resources are not directly linked to any business objects, and are associated only with the Profile which exposes them. These could serve theoretically any purpose as part of an application solution, but are typically used to provide configuration files and the like to Informer applications.
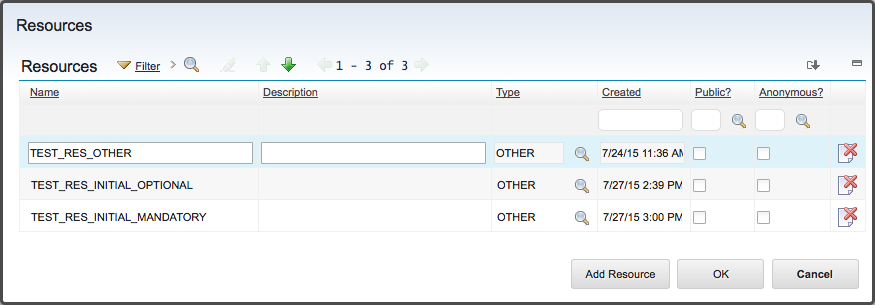
Resources have a declared name, description, and type. The names are used by the mobile applications to request these resources, and as such should not change after application development is complete.
Resources are available to all Informer users, and can also be made available to anonymous users by checking the "public" and"anonymous" checkboxes.
|
Note
|
Starting with Informer 5.4, users can be either registered users, or anonymous public users. Having a profile enabled for "Public" but not "Anonymous" is not currently supported. |
Resources can be imported using the "Add Resource" button.
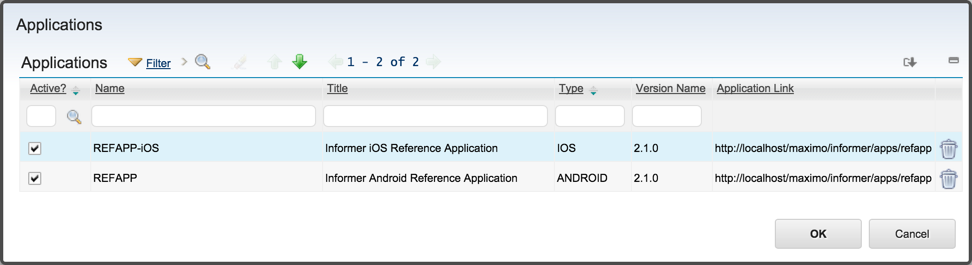
Applications
The Applications action allows a system administrator to view the available Informer application packages for the selected profile.
The Name field is the name of the application and often matches the profile. The Title is a short description of the application. The Type is either ANDROID or IOS depending on the application package. The Version name is the semantic version number provided by the developer. Finally the Application Link is the URL where the application can be downloaded from, which will be included in the communication template if an application link is sent to a user from the Users tab.
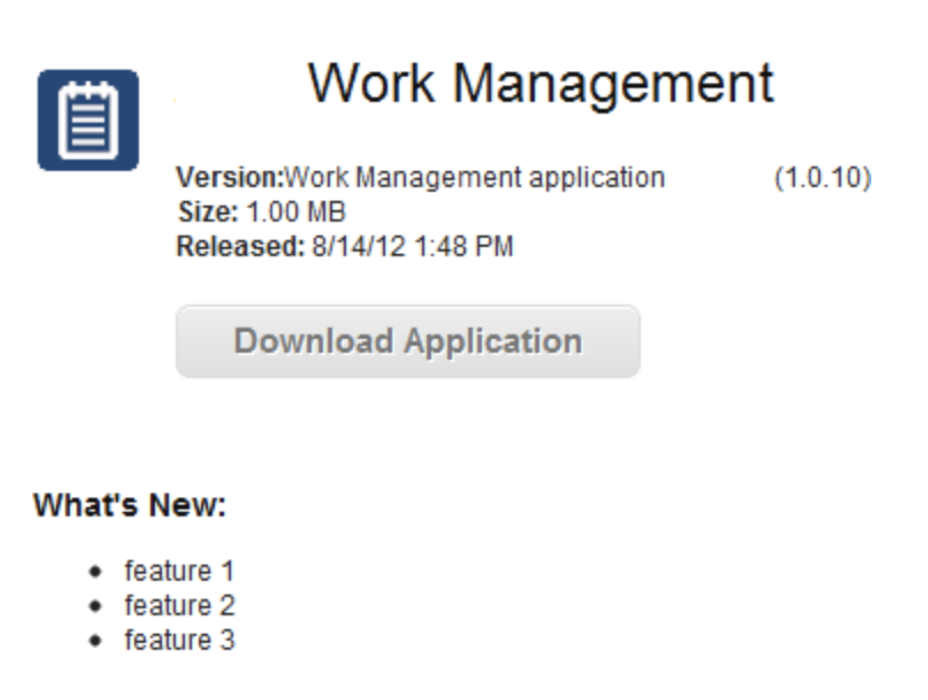
The application deployment page is configurable and is based on a Velocity template, but a sample deployment page for the Android application shown above would look similar to the following:
Sessions
The Sessions action allows the user to view all active session information including the session key, which can be matched to log event entries, the user name, the last time an action was performed on the session, and when the session will expire. The session can also be forced to expire by deleting the record.

Monitor
The Monitor action allows an administrator to view current state of the Informer processing queues and their processors, as well as performance information if available. When an action occurs within Maximo that may impact a record on a device the action information is put into a queue to be processed in the background. This ensures that the Maximo UI is never impacted by the evaluation of records destined for mobile devices. To ensure that Informer remains scalable, the queue is designed for high volume parallel processing across multiple threads and multiple nodes within a cluster. Being able to view the state of the various threads across the nodes in the cluster is key to understanding the system health and performance.
Note that when the Maximo system is in Admin Mode, queue processing is suspended.
There are three categories of Queue Processor: Notification, Catalog, and Push.
Notification Queue Tab
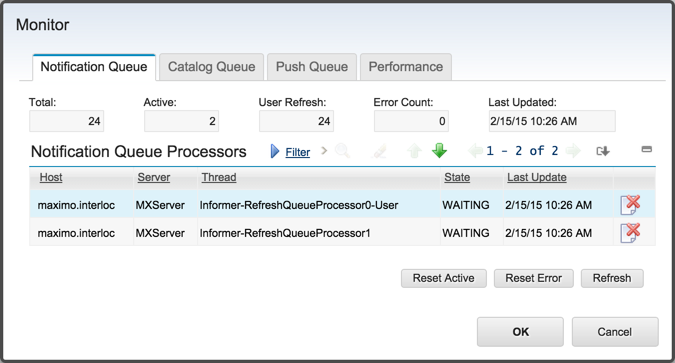
The Notification Queue dialog displays:
-
The Total number of records in the queue
-
The number of records Actively being processed
-
The number of records that are User Refreshes
-
The number of records in Error status
-
The last update time stamp when the information was collected from the system
The Total records in the queue will include:
-
User Refreshes
-
Notification Refreshes
Active records are those being currently evaluated by the queue processors. A queue processor may evaluate more than one record at a time, in the case that a notification record is present for more than one user.
User Refreshes are evaluations of the query or workflow process that defines the records to be sent to the user. This evaluation determines whether records have come into or gone out of scope of the query or the user’s workflow inbox. These will add and/or remove user notifications, as displayed on the User Tab for each user.
If an error is encountered during processing, in most cases the error is logged to the Maximo log and the record is automatically retried.
When an unexpected error occurs, the error is logged to the Maximo log and the record is retried according to the system property informer.queue.maxerror (or 5 times if this property is not set).
If this retry count is exceeded, the refresh queue entry is marked in error, and will not be further evaluated until it is reset by an administrator.
Notification Queue Processors
The Queue Processors table then provides information about each Host running one or more processing threads, the node name of the JVM, the name of the thread, its current stated, WAITING, ADMIN MODE, or ACTIVE and the time stamp when the data was last updated. In the screen shot below there are two threads running on a single host running a single JVM node.

Actions
The Delete Selected button will delete the selected records from the queue without reprocessing them.
The Reset Selected button will force the selected records to reset. This is useful if the cause of the error has been resolved, and allows the records to be processed by the queue processors.
The Refresh button can be clicked to refresh the data on the screen with newly collected information from the server if it is available.
The Reset Active button allows an administrator to force all active processes to reset. This is useful if a node improperly shuts down and never recovers, which can leave records in the queue marked as active but with nothing actively processing, which can then lead to updates not being delivered to the device.
The Reset Error button allows an administrator to force all records in Error status to reset. This is useful if the cause of the error has been resolved, and allows the records to be processed by the queue processors.
Catalog Queue Tab
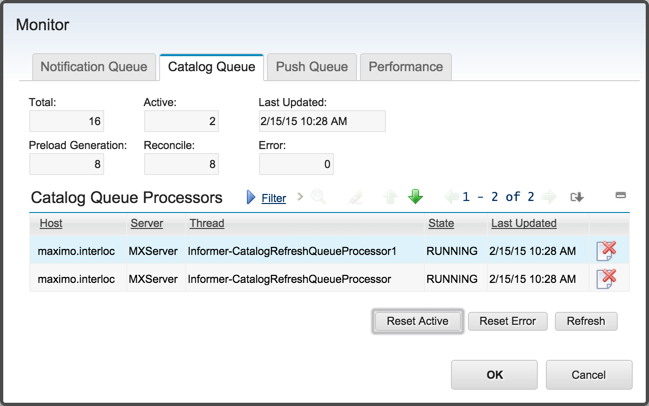
The Catalog Queue dialog displays:
-
The Total number of records in the queue
-
The number of records Actively being processed
-
The number of records that are Preload Generation tasks
-
The number of records that are Catalog Reconcile tasks
-
The number of records in Error status
-
The last update time stamp when the information was collected from the system
The Total records in the queue will include:
-
Catalog record refreshes
-
Initialization tasks
-
Preload generation tasks
-
Reconciliation tasks
The actions presented and the Queue Processors interface work the same as described for the Notification tab, above.
Push Queue Tab
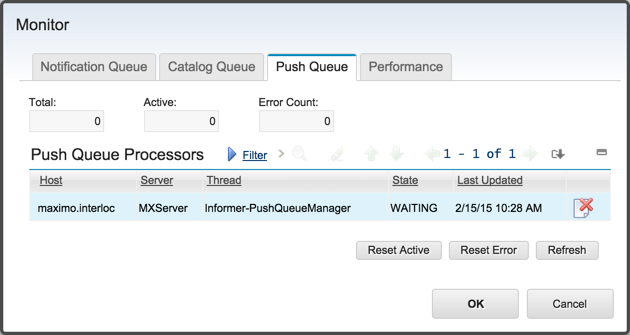
Informer’s push notifications work on an Informer queue as well.
The Push Queue dialog displays:
-
The Total number of records in the queue
-
The number of records Actively being processed
-
The number of records in Error status
The Total records in the queue will include:
-
Pending outbound FCM communications
-
Pending outbound APNS communications
The actions presented and the Queue Processors interface work the same as described for the Notification tab, above.
Performance Tab
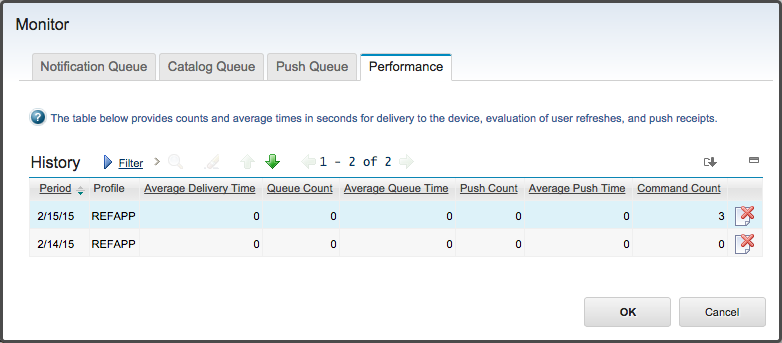
Historical performance information presented on this tab is generated by the "InformerStats" CronTask, if enabled.
Profile Groups
Profile Groups allow an administrator to alter the application behavior based on one or more assigned Profile Options that were configured by the application developer. The Group name is an arbitrary name assigned by the administrator that is used to group one or more options into a logical grouping that can be assigned to one or more users. Profile Options are cumulative for a user, aggregated across all groups that the user belongs to.
The assigned users must be valid users on the currently selected Informer profile. Clicking the Import Users from Group allows the administrator to select a Maximo security group and import all the users of that group, first to the profile and then to the Profile Group.
To assign multiple users to a Profile Group click the Select Users button and select one or more profile users to assign to the Profile Group.
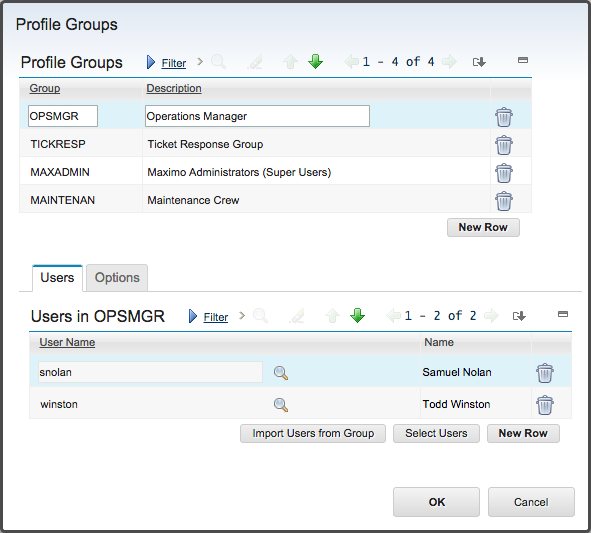
Options tab provides access to assign Profile Options to the selected Profile Group. Clicking the Select Options button allows the user to select one or more Profile Options defined by the application developer and associated with the Informer profile.

Profile Options
Profile options are named options that an application developer can use to conditionally alter application behavior based on a user’s assigned named options. Typically these options are on / off switches where if a user has the option assigned through a Profile Groups assignment then the application behavior will be altered accordingly.
It should be noted that option names are arbitrary; devoid of intrinsic meaning and require application logic to be developed to drive specific behavior.

Reconcile All User Notifications
Selecting the Reconcile All User Notifications action will cause all notifications for all users to be reevluated for accuracy. Please note that this could take several minutes depending on the number of users and the complexity of the notifications.
Generate All Catalog Preloads
Selecting the Generate All Catalog Preloads action will cause all preloaded catalogs to be marked as invalid and queued to be regenerated. Please note that depending on the number of catalogs and the complexity of the catalog structures, this operation can take a minutes or hours before the preloads finish generating. When each Catalog finishes, its corresponding preload timestamp field will be updated in the Catalogs table on the Catalogs tab.
Import / Export Profile
Informer profiles can be exported from one system and imported to another.
This allows a profile to be developed on one system and then migrated to test and production once verified.
To export a profile select ![]() Export Profile from the Common Actions toolbar.
This will open a new window with an XML file that can be saved and then reimported to another system.
Depending on the browser the user may just be prompted to save the file directly.
Export Profile from the Common Actions toolbar.
This will open a new window with an XML file that can be saved and then reimported to another system.
Depending on the browser the user may just be prompted to save the file directly.
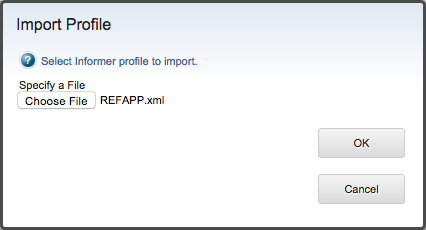
To import an exported profile select ![]() Import Profile from the Common Actions toolbar.
A dialog will be displayed to allow the user to select a previously exported XML file.
Select the file and then click the OK button.
Import Profile from the Common Actions toolbar.
A dialog will be displayed to allow the user to select a previously exported XML file.
Select the file and then click the OK button.
If no version of the profile exists then a new profile is created.Users must then be added, manually. If a different version of the profile exists, it is deactivated, deleted, and then the new profile is created in its place. As a convenience, any existing users are retained, but user notifications may need to be regenerated.
Note that the imported profile will be inactive and must be reactivated before use.
Activate Profile
Selecting the Activate Profile select action menu item causes the profile to become active and registers the listeners within the Maximo system required to capture events that are relevant to the profile and send notifications to the users as defined by the profile.
Before the Profile can be activated, all Catalogs have been initialized. Profile activation will trigger a temporary increase in the Catalog Queue Processors as the Profile checks for any changes it missed while it was deactivated.
Deactivate Profile
Deactivating a profile stops all listeners from capturing system events relevant to the profile and prevents application users from accessing the profile and if connected, the application itself.
Duplicate Profile
Currently Informer profiles do not support duplication. This menu item is provided to be consistent with other Maximo applications that do not support duplication, but still display the Duplicate menu item.
Delete Profile
The current profile will be deactivated if necessary, then deleted from the system along with all associated records.
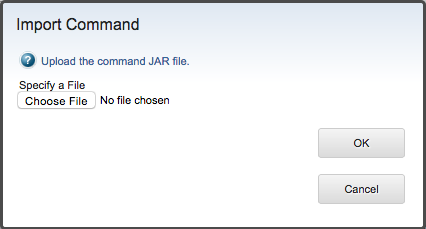
Import Command
Importing a command allows the user to upload a new command or a new version of an existing command to the system without restarting. The command is a Java JAR file that contains one or more class files that implement the command.
To import the command, select the Import Command action, then using the dialog provided locate the JAR file to upload, then click the OK button to complete the upload. The class files will be imported into the system and will be made available in the Commands action.
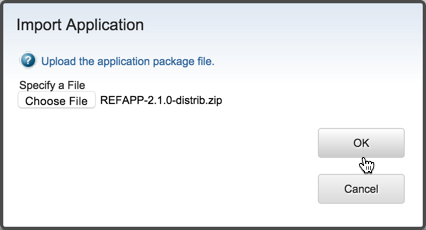
Import Application
The Import Application action allows an administrator to upload a new application bundle, as provided by a developer, to the server for deployment. The application can then be managed from the Applications dialog.
Application Bundle
The Application Bundle is an archive that includes:
-
The Mobile Application file (
.apkfor Android,.ipafor iOS) -
The application’s icon drawable, named
ic_launcher.png -
The bundle manifest (
manifest.xml), which takes the following format:Examplemanifest.xml<manifest> <title>Application Title</title> <description>One line App description</description> <versionname>Readable version name (eg. 1.0.0)</versionname> <version>incremented version counter (eg 8)</version> <bundle>com.interlocsolutions.informer.yourcustomer.appname</bundle> <name>Readable App Name (eg MINIMO)</name> </manifest> -
Release-notes.html, a brief outline of the revisions made in this release version.
ExampleRelease-notes.html<p>1.5.1 New Features:</p> <ul> <li>Fixed a bug in the list view</li> <li>released for Informer 5 </li> </ul>
This package should be zipped up into an archive. It is then uploaded to Informer via the Import Application Action in the Informer Developer interface.
|
Important
|
If the application is available on multiple platforms, separate archives will have to made for each (i.e. you cannot include a .apk file and an .ipa file in the same .zip).
|
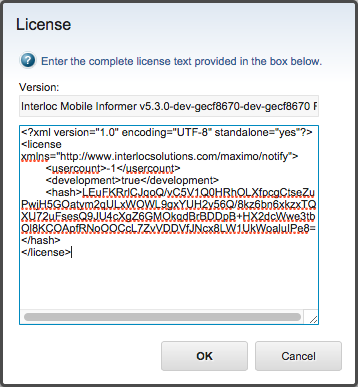
License
The License menu item allows the provided Informer license XML to be applied to the system. The dialog box displays the current version and release information for the installed Informer server. It also displays current license details.
Click on the Import button to import a new license and immediately apply the license restrictions.
Troubleshooting
Missing Informer License
Problem
While attempting to import or create a profile you receive any of the following errors:
-
BMXAA4195E - The Application field requires a value.
-
BMXAA4191E - The value <maximo_application_name> is not valid for Application. Specify a valid value for Application.
Solution
A valid Informer license is missing and must be added to the server.
-
Select Action –> License
-
Import a valid Informer license (XML).
-
Retry the profile import / creation.
Entity-Relation Diagram
